activating windows 7 OEM way
I will start with basics of how a copy of windows gets automatically activated when installed on OEM (original equipment manufacturer) based PCs, traditionally when a copy of windows is installed you have insert your license key and activate by verifying it with Microsoft via internet or by getting a confirmation id over telephone. But with OEMs like Dell, Sony, Lenovo etc. a need was felt to get windows activated right upon installation without going through all the annoyance. With Windows XP a method called System-Locked Pre-installation (SLP) was devised. This method uses an area of BIOS to store some identification data, in SLP 1.0 the version included with XP, this was simply the name of the OEM. There are files on hard disk when windows is installed which were being matched with the value from BIOS for verification, if matched your copy gets activated. SLP 1.0 was cracked quite easily which demanded for a more complex system to be developed resulting in SLP 2.0 included with Windows Vista and SLP 2.1 shipped with Windows 7. Both methods works similarly with only a change in marker in Windows 7 based PCs. A SLP 2.1 involves checking the presence of a matching OEM-supplied key, an OEM-specific certificate and the most challenging part of the puzzle an OEM-specific ACPI_SLIC table (SLIC 2.1 table) before it can activate.
Now moving to next step, OEM-key and OEM-specific certificates were being cracked very early when a copy was leaked illegally from Lenovo, but the real hack was to bypass the SLIC table. Methods were developed commonly known as Loaders (also called the softmod) which involves loading the SLIC table in memory before the main OS loads thereby fooling the system with a fake SLIC table. These methods involves Linux based loaders and sometimes may install trozens or other malware on your PC. Other method called the hardmod also exist which modifies the BIOS and may lead to complete system damage.
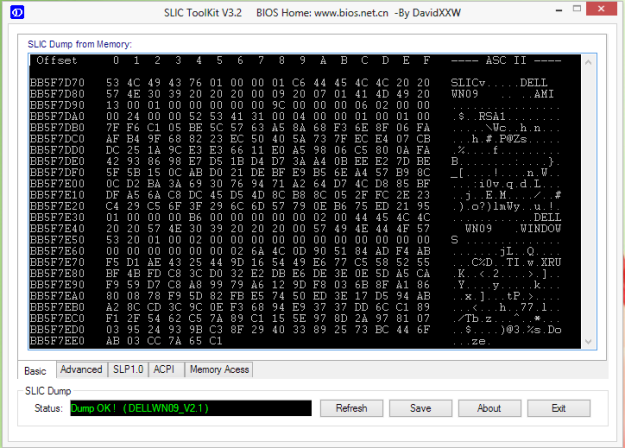
We will now learn how to get your copy of windows 7 genuine without compromising the security and system itself. The first step is to check if your BIOS has a SLIC 2.1 table or not, and can be easily done using the SLIC_ToolKit can be downloaded from here. Run it and you will see the window indicating the presence of SLIC table 2.1 marked “Dump OK ! ( DELLWN09_V2.1 )”.
In case you don’t have version 2.1 you first need to get your BIOS updated. Now moving on to next step get OEM certificate from here . Select the one based on your OEM and move it to C:, next run the following commands after opening cmd as administrator
slmgr.vbs -ilc C:\DELL.xrm-ms
in case your OEM is DELL, next first download a set of OEM keys from here and select the one based on OS version and run the command
slmgr.vbs -ipk xxxxx-xxxxx-xxxxx-xxxx-xxxxx
now check your activation status by entering
slmgr.vbs -dli
hope you enjoyed the blog and one caution here the SLIC_ToolKit offers advance features to even modify BIOS entries so play safe … !!!
